Hell0oooooo OpenStackies!
Recently I got an opportunity to work in integrating Brocade VDX switches with OpenStack. Unlike default OpenStack setup which has OVS switch with GRE tunneling mechanism, this setup for integrating Brocade VDX switch needs additional configurations.
Since Brocade switch is proprietary, it is hard to find an open community to help with this type of integrations. So I planned to come up with the clear document that helps to integrate VDX switch with OpenStack using Neutron-vdx-l2-plugin.
OpenStack with VLAN network:
The default document in openstack.org is for the OpenStack installation using GRE tunneling mechanism. We have an option in the OpenStack network to use VLAN instead of using tunneling mechanism like GRE/VxLAN. Configuring VLAN network in OpenStack need some additional works in physical switches also (Not for Brocade VDX switches).
The VLAN type network in the OpenStack create unique segment ID (VLAN ID) for each local networks being created in OpenStack tenant. So in this case, the openstack engineer should manually configure the physical switch that’s being connected with all OpenStack nodes, whenever the user created new network inside the user tenant.
Brocade VDX Switch:
Configuring VLAN for physical switches is not a big issue if the setup is the private cloud setup with limited number of networks quota. But when it comes to Public or big data center setup it is not a good idea to go with normal switches to configure OpenStack with VLAN network. Since, we can’t create & delete the VLAN tag in physical switch port every time when the new local network is being created with new unique VLAN ID. To overcome this manual configuration problem, Brocade VDX switch helps us to configure VLAN automatically with the VLAN ID that’s being created for every local network.
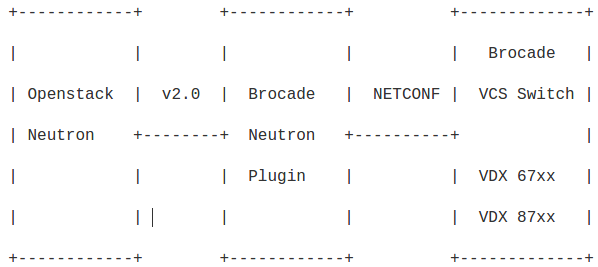
There is a brocade-neutron-plugin support available in openstack.org for brocade VDX switch integration. Brocade Neutron Plugin implements the Neutron v2.0 API to automatically configure the VLAN in VDX switch. Switches running NOS (e.g. VDX 67xx, VDX 87xx) are supported. It uses NETCONF at the backend to configure the Brocade switch.
Setup Architecture:
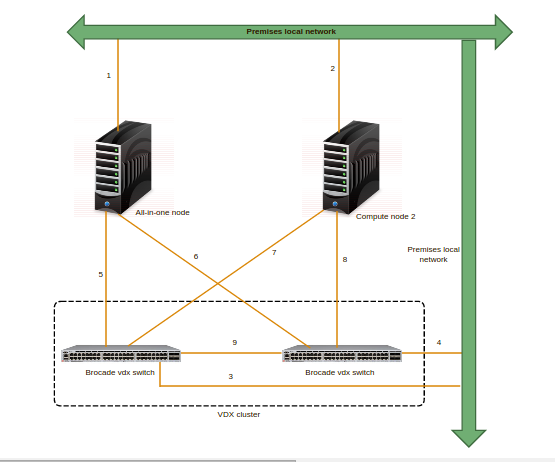
In this minimal setup, I used two physical servers one has all-in-one Juno-OpenStack setup which has Keystone, Glance, Nova & Nova-compute , Neutron services running in it and the later server has nova-compute service running in it which is added as the compute node to the existing all-in-one Juno setup.
Here, I used two VDX switch to form VDX cluster which is the minimal requirement for setting up high availability between switches
Network Connections:
Link 1 & 2 – Connecting the physical server to the premise local network (192.168.1.x). Openstack service to service talk and Internet connection is carried out through this network.
Link 3 & 4 – Connecting VDX switches to the Premise local network (192.168.1.x). Accessing & configuring VDX switches through ssh is carried out using this Link.
Link 5, 6,7 & 8 – connecting the physical server with both the switches. This link is for VM data path network. Unlike normal setup, here we configured two NIC of each server for VM data path network. Notably both the NICs in same server has same IP configured (using NIC bonding technique) which helps the switches to resume the connection for same IP(High availability) when any one switches in the VDX cluster failed.
Link 9 – ISL connection within the VDX cluster.
Openstack Integration with Brocade VDX switch:
Here, In the below steps, I will be installing Openstack JUNO setup with neutron VLAN network. I also added the steps to integrate the VDX switch with this setup in the respective configuration files.
NIC bonding:Network bonding is a method of combining (joining) two or more network interfaces together into a single interface. It will increase the network throughput, bandwidth and will give redundancy. If one interface is down or unplugged, the other one will keep the network traffic up and alive. Network bonding can be used in situations wherever you need redundancy, fault tolerance or load balancing networks. Install bonding kernel Module: apt-get install ifenslave Now, we have to make sure that the correct kernel module bonding is present and loaded at boot time. Edit /etc/modules file, cat /etc/modules Add “bonding” in the end.
Now, stop networking service. sudo modprobe bonding #Configure bond0 Interface
Save and close file. Note: Here we will be configuring active-backup mode. 10.0.0.101 is bond0 IP address. ifup bond0 Note: If you have any problems while bringing up bond0, restart and check again. #Test Network Bondingcat /proc/net/bonding/bond0
As you see in the above output, the bond0 interface is up and running and it is configured as active-backup(mode1) mode. In this mode, only one slave in the bond is active. The other one will become active, only when the active slave fails. |
VDX device settings:
| 1) The switch should be in Logical Chassis Mode.(ie Config Mode: Distributed) # show vcs Config Mode : Distributed VCS Mode: Logical Chassis VCS ID: 88 VCS GUID : 1a06c504-b10c-485a-8d81-23b6416fdf80 Total Number of Nodes: 2 Rbridge-Id WWN Management IP VCS Status Fabric Status HostName ————————————————————————————————————– 1 10:00:50:EB:1A:22:60:46 10.25.225.252 Online Online sw0199 >10:00:00:27:F8:CB:06:F4* 10.25.225.199 Online Online sw0 ————————————————————————————————————– 2) In switch, configure port-profile mode on all the VCS connected ports. sw0# configure terminal Entering configuration mode terminal sw0(config)# interface TenGigabitEthernet 199/0/3 Repeat for other connected ports |
Openstack Installation:
Note:
In this post, I have combined the premise network(API & Internet access) and OpenStack management network(Communication between OpenStack services) in same NIC to overcome with the NIC shortage in servers.
NIC eth0 – 192.168.1.0/24 (Premise + Management network)
NIC bond1 – 10.0.0.0/24 (VM data network which is connected with VDX switches
Even though, we plan to deploy all-in-one setup with one compute node added, the below steps is for common 3 nodes (controller, network, compute) installation. So that you can design your own setup architecture.
All passwords or tokens were set to “hellovinoth″.
1.Set Network
In controller:
| # The loopback network interface auto lo iface lo inet loopback# The Premise & Management network interface auto eth0 iface eth0 inet static address 192.168.1.101 netmask 255.255.255.0 network 192.168.1.0 gateway 192.168.1.200 broadcast 192.168.1.255 |
In compute:
|
# The loopback network interface # The Premise & Management network interface #VM data path network with active-back bonding. #eth1 configuration #eth2 configuration |
In network node:
| # The loopback network interface auto lo iface lo inet loopback# The Premise & Management network interface# The Premise & Management network interface auto eth0 iface eth0 inet static address 192.168.1.103 netmask 255.255.255.0 network 192.168.1.0 gateway 192.168.1.200 broadcast 192.168.1.255auto bond0auto bond0 iface bond0 inet static address 10.0.0.103 netmask 255.255.255.0 network 10.0.0.0 broadcast 10.0.0.255 bond-mode active-backup bond-miimon 100 bond-slaves none #eth1 configuration #eth2 configuration |
2.hostname
All node:
In /etc/hosts
| # controller 192.168.1.101 controller # network 192.168.1.102 compute1 # compute1 192.168.1.103 network1 |
3.update system
All node:
sudo apt-get update && sudo apt-get update –fix-missing && sudo apt-get upgrade -y && sudo apt-get dist-upgrade -y
#reboot
4.NTP
In Controller node:
apt-get install ntp
To configure the NTP service
In controller:
Edit the /etc/ntp.conf
| server controller iburst restrict -4 default kod notrap nomodify restrict -6 default kod notrap nomodify |
In other nodes:
Edit the /etc/ntp.conf
| server controller iburst |
5.Controller mysql
apt-get install mariadb-server python-mysqldb
settings:
/etc/mysql/my.cnf
| default-storage-engine = innodb innodb_file_per_table collation-server = utf8_general_ci init-connect = ‘SET NAMES utf8’ character-set-server = utf8 bind-address = 0.0.0.0 |
5.OpenStack Juno Packages
In all node:
#Configure prerequisites
Install the python-software-properties package to ease repository management:
apt-get install python-software-properties
To enable the OpenStack repository enable the Ubuntu Cloud archive repository:
add-apt-repository cloud-archive:juno
To finalize installation Upgrade the packages on your system:
apt-get update && apt-get dist-upgrade
6.Controller RabbitMQ
apt-get install rabbitmq-server
rabbitmqctl change_password guest hellovinoth
7.Controller Keystone
apt-get install keystone python-keystoneclient
| mysql -u root -pCREATE DATABASE keystone; GRANT ALL PRIVILEGES ON keystone.* TO ‘keystone’@’localhost’ IDENTIFIED BY ‘hellovinoth’; GRANT ALL PRIVILEGES ON keystone.* TO ‘keystone’@’controller’ IDENTIFIED BY ‘hellovinoth’; GRANT ALL PRIVILEGES ON keystone.* TO ‘keystone’@’%’ IDENTIFIED BY ‘hellovinoth’; |
Edit the /etc/keystone/keystone.conf
| [DEFAULT] admin_token = ADMIN_TOKEN verbose = True[database][database] connection = mysql://keystone:hellovinoth@controller/keystone |
#sync DB
su -s /bin/sh -c “keystone-manage db_sync” keystone
rm -f /var/lib/keystone/keystone.db
service keystone restart
(crontab -l -u keystone 2>&1 | grep -q token_flush) || echo ‘@hourly /usr/bin/keystone-manage token_flush >/var/log/keystone/keystone-tokenflush.log 2>&1’ >> /var/spool/cron/crontabs/keystone
8.Controller keystone default user
#Set environment:
export OS_SERVICE_TOKEN=hellovinoth
export OS_SERVICE_ENDPOINT=http://controller:35357/v2.0
#Create user & projects:
keystone tenant-create –name admin –description “Admin Tenant”
keystone user-create –name admin –pass hellovinoth –email [email protected]
keystone role-create –name admin
keystone user-role-add –tenant admin –user admin –role admin
keystone role-create –name _member_
keystone user-role-add –tenant admin –user admin –role _member_
keystone tenant-create –name demo –description “Demo Tenant”
keystone user-create –name demo –pass hellovinoth –email [email protected]
keystone user-role-add –tenant demo –user demo –role _member_
keystone tenant-create –name service –description “Service Tenant”
9.Controller keystone endpoint
keystone service-create –name keystone –type identity –description “OpenStack Identity”
keystone endpoint-create –service-id $(keystone service-list | awk ‘/ identity / {print $2}’) –publicurl http://controller:5000/v2.0 –internalurl http://controller:5000/v2.0 –adminurl http://controller:35357/v2.0 –region regionOne
10.Controller keystone Verify
unset OS_SERVICE_TOKEN OS_SERVICE_ENDPOINT
keystone –os-tenant-name admin –os-username admin –os-password hellovinoth –os-auth-url http://controller:35357/v2.0 token-get
keystone –os-tenant-name admin –os-username admin –os-password hellovinoth –os-auth-url http://controller:35357/v2.0 tenant-list
11.Controller Glance
mysql -u root -p
CREATE DATABASE glance;
GRANT ALL PRIVILEGES ON glance.* TO ‘glance’@’localhost’ IDENTIFIED BY ‘hellovinoth’;
GRANT ALL PRIVILEGES ON glance.* TO ‘glance’@’controller’ IDENTIFIED BY ‘hellovinoth’;
GRANT ALL PRIVILEGES ON glance.* TO ‘glance’@’%’ IDENTIFIED BY ‘hellovinoth’;
#keystone glance
Maybe you need some env
export OS_SERVICE_TOKEN=hellovinoth
export OS_SERVICE_ENDPOINT=http://controller:35357/v2.0
keystone user-create –name glance –pass hellovinoth
keystone user-role-add –user glance –tenant service –role admin
keystone service-create –name glance –type image –description “OpenStack Image Service”
keystone endpoint-create –service-id $(keystone service-list | awk ‘/ image / {print $2}’) –publicurl http://controller:9292 –internalurl http://controller:9292 –adminurl http://controller:9292 –region regionOne
#glance install
apt-get install glance python-glanceclient
#/etc/glance/glance-api.conf
| [DEFAULT] verbose = True[database][database] connection = mysql://glance:hellovinoth@controller/glance[keystone_authtoken][keystone_authtoken] auth_uri = http://controller:5000/v2.0 identity_uri = http://controller:35357 admin_tenant_name = service admin_user = glance admin_password = hellovinoth[paste_deploy] [paste_deploy] |
#/etc/glance/glance-registry.conf
| [DEFAULT] verbose = True[database][database] connection = mysql://glance:hellovinoth@controller/glance[keystone_authtoken][keystone_authtoken] auth_uri = http://controller:5000/v2.0 identity_uri = http://controller:35357 admin_tenant_name = service admin_user = glance admin_password = hellovinoth[paste_deploy] [paste_deploy] |
#sync db
su -s /bin/sh -c “glance-manage db_sync” glance
rm -f /var/lib/glance/glance.sqlite
#restart service
service glance-registry restart
service glance-api restart
12.Controller Glance Verify
#keystonerc
| export OS_TENANT_NAME=admin export OS_USERNAME=admin export OS_PASSWORD=hellovinoth export OS_AUTH_URL=http://controller:35357/v2.0 |
mkdir ~/image
cd ~/image
curl -O http://cdn.download.cirros-cloud.net/0.3.3/cirros-0.3.3-x86_64-disk.img
glance image-create –name “cirros-0.3.3-x86_64” –file cirros-0.3.3-x86_64-disk.img –disk-format qcow2 –container-format bare –is-public True –progress
13.Controller Nova
mysql -u root -p
| CREATE DATABASE nova; GRANT ALL PRIVILEGES ON nova.* TO ‘nova’@’localhost’ IDENTIFIED BY ‘hellovinoth’; GRANT ALL PRIVILEGES ON nova.* TO ‘nova’@’controller’ IDENTIFIED BY ‘hellovinoth’; GRANT ALL PRIVILEGES ON nova.* TO ‘nova’@’%’ IDENTIFIED BY ‘hellovinoth’; |
#keystone nova
keystone user-create –name nova –pass hellovinoth
keystone user-role-add –user nova –tenant service –role admin
keystone service-create –name nova –type compute –description “OpenStack Compute”
keystone endpoint-create –service-id $(keystone service-list | awk ‘/ compute / {print $2}’) –publicurl http://controller:8774/v2/%\(tenant_id\)s –internalurl http://controller:8774/v2/%\(tenant_id\)s –adminurl http://controller:8774/v2/%\(tenant_id\)s –region regionOne
#controller nova services install
apt-get install nova-api nova-cert nova-conductor nova-consoleauth nova-novncproxy nova-scheduler python-novaclient
#controller nova configure
/etc/nova/nova.conf
| [database] connection = mysql://nova:hellovinoth@controller/nova[DEFAULT][DEFAULT] verbose = Truemy_ip = 192.168.1.101 rpc_backend = rabbit rabbit_host = controller rabbit_password = hellovinoth vncserver_listen = 192.168.1.101 vncserver_proxyclient_address = 192.168.1.101[keystone_authtoken][keystone_authtoken] auth_uri = http://controller:5000/v2.0 identity_uri = http://controller:35357 admin_tenant_name = service admin_user = nova admin_password = hellovinoth[glance] [glance] |
#sync nova DB
su -s /bin/sh -c “nova-manage db sync” nova
rm -f /var/lib/nova/nova.sqlite
#restart services
service nova-api restart
service nova-cert restart
service nova-consoleauth restart
service nova-scheduler restart
service nova-conductor restart
service nova-novncproxy restart
14.Compute Node Nova
apt-get install nova-compute
#configure
/etc/nova/nova.conf
|
[DEFAULT] [keystone_authtoken] [glance] |
#nova compute type
/etc/nova/nova-compute.conf
| [libvirt] virt_type = kvm |
#Restart nova-compute service
service nova-compute restart
rm -f /var/lib/nova/nova.sqlite
15.Controller nova Verify
nova service-list
nova image-list
16.Controller node – Neutron
mysql -u root -p
| CREATE DATABASE neutron; GRANT ALL PRIVILEGES ON neutron.* TO ‘neutron’@’localhost’ IDENTIFIED BY ‘hellovinoth’; GRANT ALL PRIVILEGES ON neutron.* TO ‘neutron’@’controller’ IDENTIFIED BY ‘hellovinoth’; GRANT ALL PRIVILEGES ON neutron.* TO ‘neutron’@’%’ IDENTIFIED BY ‘hellovinoth’; |
#keystone neutron
keystone user-create –name neutron –pass hellovinoth
keystone user-role-add –user neutron –tenant service –role admin
keystone service-create –name neutron –type network –description “OpenStack Networking”
keystone endpoint-create –service-id $(keystone service-list | awk ‘/ network / {print $2}’) –publicurl http://controller:9696 –adminurl http://controller:9696 –internalurl http://controller:9696 –region regionOne
#neutron controller service install
apt-get install neutron-server neutron-plugin-ml2 python-neutronclient
#settings
/etc/neutron/neutron.conf
| [DEFAULT] verbose = True auth_strategy = keystone rpc_backend = rabbit rabbit_host = controller rabbit_password = hellovinoth core_plugin = ml2 service_plugins = router allow_overlapping_ips = True notify_nova_on_port_status_changes = True notify_nova_on_port_data_changes = True nova_url = http://controller:8774/v2 nova_admin_auth_url = http://controller:35357/v2.0 nova_region_name = regionOne nova_admin_username = nova nova_admin_tenant_id = <SERVICE_TENANT_ID> nova_admin_password = hellovinoth[keystone_authtoken][keystone_authtoken] auth_uri = http://controller:5000/v2.0 identity_uri = http://controller:35357 admin_tenant_name = service admin_user = neutron admin_password = hellovinoth[database] connection = mysql://neutron:hellovinoth@controller/neutron |
#configure the Modular Layer 2 (ML2) plug-in
/etc/neutron/plugins/ml2/ml2_conf.ini
| [ml2] tenant_network_types = vlan type_drivers = local,flat,vlan,gre,vxlan mechanism_drivers = openvswitch,brocade[ml2_type_vlan][ml2_type_vlan] network_vlan_ranges = physnet2:2000:2999[securitygroup][securitygroup] enable_security_group = True enable_ipset = True firewall_driver = neutron.agent.linux.iptables_firewall.OVSHybridIptablesFirewallDriver |
Configure Brocade plug-in
#To use the Brocade plug-in with OpenStack Networking
Install the Brocade-modified Python netconf client (ncclient) library, which is available at https://github.com/brocade/ncclient:
git clone https://github.com/brocade/ncclient
As root, run this command:
cd ncclient;python setup.py install
Edit the /etc/neutron/neutron.conf file and set the following option:
| core_plugin = ml2 |
Edit the /etc/neutron/plugins/ml2/ml2_conf_brocade.ini file for the Brocade plug-in and specify the admin user name, password, and IP address of the Brocade switch:
| [switch] username = admin password = password address = <switch(primary) mgmt ip address> ostype = NOS osversion = autodetect physical_networks = physnet2 |
#configure nova to use neutron
/etc/nova/nova.conf
| [DEFAULT] network_api_class = nova.network.neutronv2.api.API security_group_api = neutron linuxnet_interface_driver = nova.network.linux_net.LinuxOVSInterfaceDriver firewall_driver = nova.virt.firewall.NoopFirewallDriver[neutron][neutron] url = http://controller:9696 auth_strategy = keystone admin_auth_url = http://controller:35357/v2.0 admin_tenant_name = service admin_username = neutron admin_password = hellovinoth |
#Populate the database
su -s /bin/sh -c “neutron-db-manage –config-file /etc/neutron/neutron.conf –config-file /etc/neutron/plugins/ml2/ml2_conf.ini upgrade juno” neutron
#Restart the Compute services
service nova-api restart
service nova-scheduler restart
service nova-conductor restart
#Restart the Networking service
service neutron-server restart
#Verify operation
source keystonerc
neutron ext-list
17.Network node – Neutron
/etc/sysctl.conf
| net.ipv4.ip_forward=1 net.ipv4.conf.all.rp_filter=0 net.ipv4.conf.default.rp_filter=0 |
#Implement the changes
sysctl -p
#network neutron services install
apt-get install neutron-plugin-ml2 neutron-plugin-openvswitch-agent neutron-l3-agent neutron-dhcp-agent ipset
IMPORTANT:
#Install Brocade Plugin for neutron.
apt-get insall neutron-plugin-brocade
#settings
/etc/neutron/neutron.conf
remove [database] section all connection = ? #This is not required for all in one setup.
| [DEFAULT] verbose = True rpc_backend = rabbit rabbit_host = controller rabbit_password = hellovinoth auth_strategy = keystone core_plugin = ml2 service_plugins = router allow_overlapping_ips = True[keystone_authtoken][keystone_authtoken] auth_uri = http://controller:5000/v2.0 identity_uri = http://controller:35357 admin_tenant_name = service admin_user = neutron admin_password = hellovinoth |
#To configure the Modular Layer 2 (ML2) plug-in
edit /etc/neutron/plugins/ml2/ml2_conf.ini
| [ml2] tenant_network_types = vlan type_drivers = local,flat,vlan,gre,vxlan mechanism_drivers = openvswitch,brocade[ml2_type_vlan][ml2_type_vlan] network_vlan_ranges = physnet2:2000:2999[securitygroup][securitygroup] enable_security_group = True enable_ipset = True firewall_driver = neutron.agent.linux.iptables_firewall.OVSHybridIptablesFirewallDriver [ovs] |
#Configure Brocade plug-in
To use the Brocade plug-in with OpenStack Networking
Install the Brocade-modified Python netconf client (ncclient) library, which is available at https://github.com/brocade/ncclient:
git clone https://github.com/brocade/ncclient
As root, run this command:
cd ncclient;python setup.py install
Edit the /etc/neutron/neutron.conf file and set the following option:
| core_plugin = ml2 |
Edit the /etc/neutron/plugins/ml2/ml2_conf_brocade.ini file for the Brocade plug-in and specify the admin user name, password, and IP address of the Brocade switch:
| [switch] username = admin password = password address = <switch(primary) mgmt ip address> ostype = NOS osversion = autodetect physical_networks = physnet2 |
#To configure the Layer-3 (L3) agent
/etc/neutron/l3_agent.ini
| [DEFAULT] verbose = True interface_driver = neutron.agent.linux.interface.OVSInterfaceDriver use_namespaces = True external_network_bridge = br-ex |
#To configure the DHCP agent
/etc/neutron/dhcp_agent.ini
| [DEFAULT] verbose = Trueinterface_driver = neutron.agent.linux.interface.OVSInterfaceDriver dhcp_driver = neutron.agent.linux.dhcp.Dnsmasq use_namespaces = True |
#To configure the metadata agent
/etc/neutron/metadata_agent.ini
|
[DEFAULT] |
#On the controller node edit the /etc/nova/nova.conf
| [neutron] service_metadata_proxy = True metadata_proxy_shared_secret = hellovinoth service nova-api restart |
#To configure the Open vSwitch (OVS) service
service openvswitch-switch restart
ovs-vsctl add-br br-ex
ovs-vsctl add-port br-ex eth1
ovs-vsctl add-br br-bond0
ovs-vsctl add-port br-bond0 bond0
| # The loopback network interface auto lo iface lo inet loopbackauto eth0auto eth0 iface eth0 inet manual up ip address add 0/0 dev $IFACE up ip link set $IFACE up down ip link set $IFACE downauto br-exauto br-ex iface br-ex inet static address 192.168.1.102 netmask 255.255.255.0 gateway 192.168.1.200 network 192.168.1.0 broadcast 192.168.1.255 auto bond0 auto br-bond0 #eth1 configuration #eth2 configuration |
Note:- Note that the bridge mappings in the above file is changed to br-bond0 from bond0 in eth1 & eth2 configurations after ovs configuration.
#Restart network
#Restart the neutron services
service neutron-plugin-openvswitch-agent restart
service neutron-l3-agent restart
service neutron-dhcp-agent restart
service neutron-metadata-agent restart
#Verify
neutron agent-list
18.Compute node – Neutron
Edit the /etc/sysctl.conf
| net.ipv4.conf.all.rp_filter=0 net.ipv4.conf.default.rp_filter=0 |
#Implement the changes
sysctl -p
#network neutron services install
apt-get install neutron-plugin-ml2 neutron-plugin-openvswitch-agent ipset
#settings
Edit the /etc/neutron/neutron.conf
| [DEFAULT] verbose = True rpc_backend = rabbit rabbit_host = controller rabbit_password = hellovinoth auth_strategy = keystone core_plugin = ml2 service_plugins = router allow_overlapping_ips = True[keystone_authtoken] auth_uri = http://controller:5000/v2.0 identity_uri = http://controller:35357 admin_tenant_name = service admin_user = neutron admin_password = hellovinoth |
#To configure the Modular Layer 2 (ML2) plug-in
edit /etc/neutron/plugins/ml2/ml2_conf.ini
| [ml2] tenant_network_types = vlan type_drivers = local,flat,vlan,gre,vxlan mechanism_drivers = openvswitch,brocade[ml2_type_vlan] network_vlan_ranges = physnet2:2000:2999[securitygroup] enable_security_group = True enable_ipset = True firewall_driver = neutron.agent.linux.iptables_firewall.OVSHybridIptablesFirewallDriver [ovs] |
#Configure Brocade plug-in
To use the Brocade plug-in with OpenStack Networking
Install the Brocade-modified Python netconf client (ncclient) library, which is available at https://github.com/brocade/ncclient:
$ git clone https://github.com/brocade/ncclient
As root, run this command:
# cd ncclient;python setup.py install
Edit the /etc/neutron/neutron.conf file and set the following option:
| core_plugin = ml2 |
Edit the /etc/neutron/plugins/ml2/ml2_conf_brocade.ini file for the Brocade plug-in and specify the admin user name, password, and IP address of the Brocade switch:
|
[switch] |
#To configure the Open vSwitch (OVS) service
service openvswitch-switch restart
ovs-vsctl add-br br-bond0
ovs-vsctl add-port br-bond0 bond0
| # The loopback network interface auto lo iface lo inet loopback# The Premise & Management network interface# The Premise & Management network interface auto eth0 iface eth0 inet static address 192.168.1.103 netmask 255.255.255.0 network 192.168.1.0 gateway 192.168.1.200 broadcast 192.168.1.255auto bond0 iface bond0 inet manual up ip address add 0/0 dev $IFACE up ip link set $IFACE up down ip link set $IFACE down auto br-bond0 #eth1 configuration |
Note:- Note that the bridge mappings in the above file is changed to br-bond0 from bond0 in eth1 & eth2 configurations.
#Restart network
#To configure Compute to use neutron
/etc/nova/nova.conf
| [DEFAULT] network_api_class = nova.network.neutronv2.api.API security_group_api = neutron linuxnet_interface_driver = nova.network.linux_net.LinuxOVSInterfaceDriver firewall_driver = nova.virt.firewall.NoopFirewallDriver[neutron] url = http://controller:9696 auth_strategy = keystone admin_auth_url = http://controller:35357/v2.0 admin_tenant_name = service admin_username = neutron admin_password = hellovinoth |
#Restart services
service nova-compute restart
service neutron-plugin-openvswitch-agent restart
#Verify
neutron agent-list
19. Horizon Dashboard
apt-get install openstack-dashboard apache2 libapache2-mod-wsgi memcached python-memcache
#settings
/etc/openstack-dashboard/local_settings.py
| OPENSTACK_HOST = “controller” ALLOWED_HOSTS = [‘*’] CACHES = { ‘default’: { ‘BACKEND’: ‘django.core.cache.backends.memcached.MemcachedCache’, ‘LOCATION’: ‘127.0.0.1:11211’, } } |
service apache2 restart
service memcached restart
20.Verify All
source keystonerc
keystone user-list
keystone role-list
keystone tenant-list
keystone service-list
keystone endpoint-list
21.Have fun with horizon
#Login as admin user
Create external network

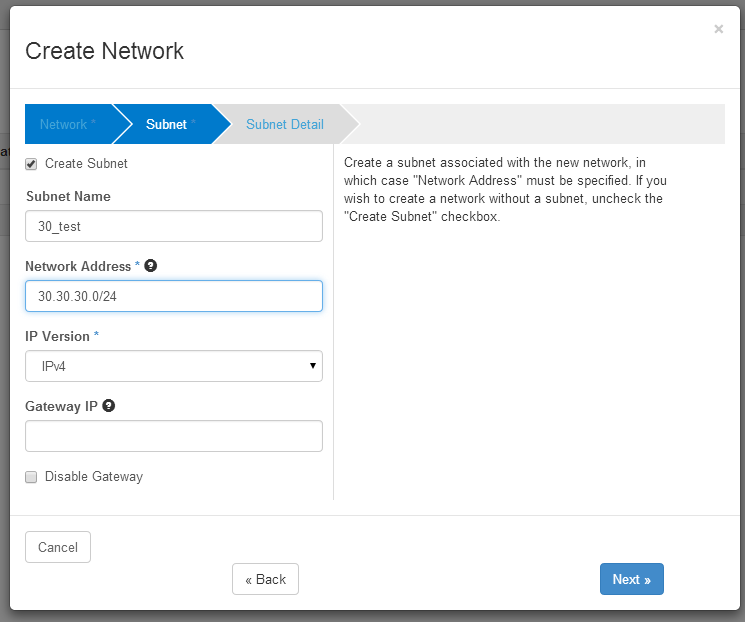
Create External subnet:

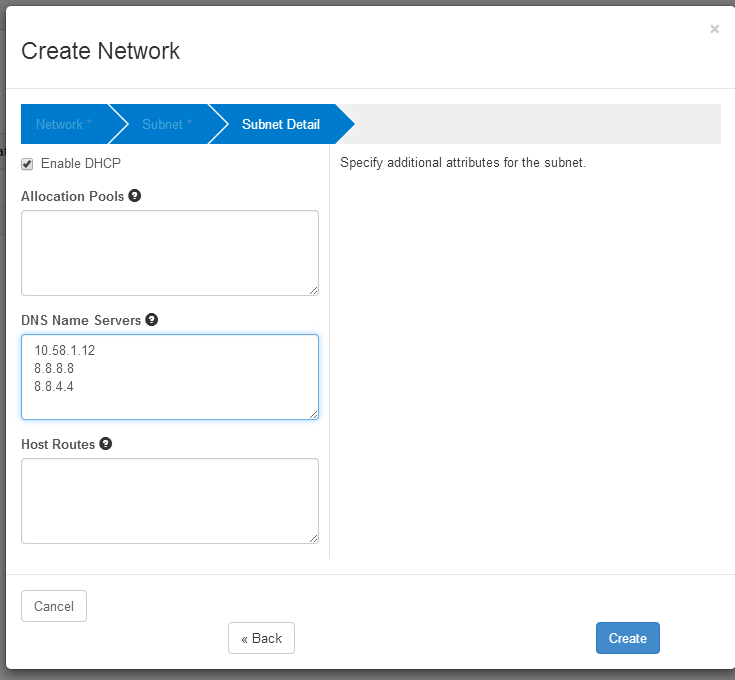
External subnet detail
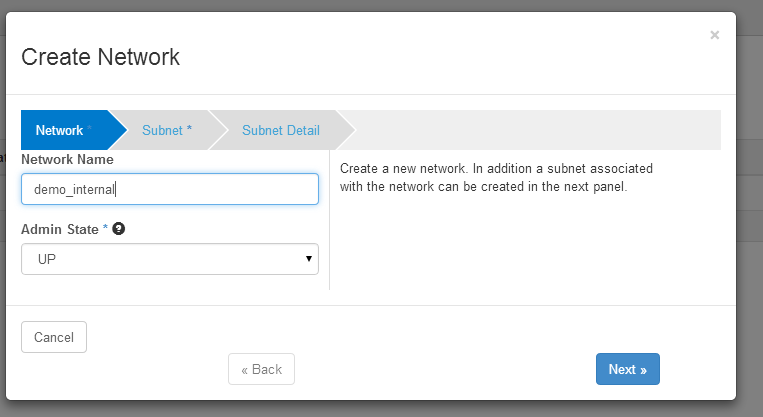
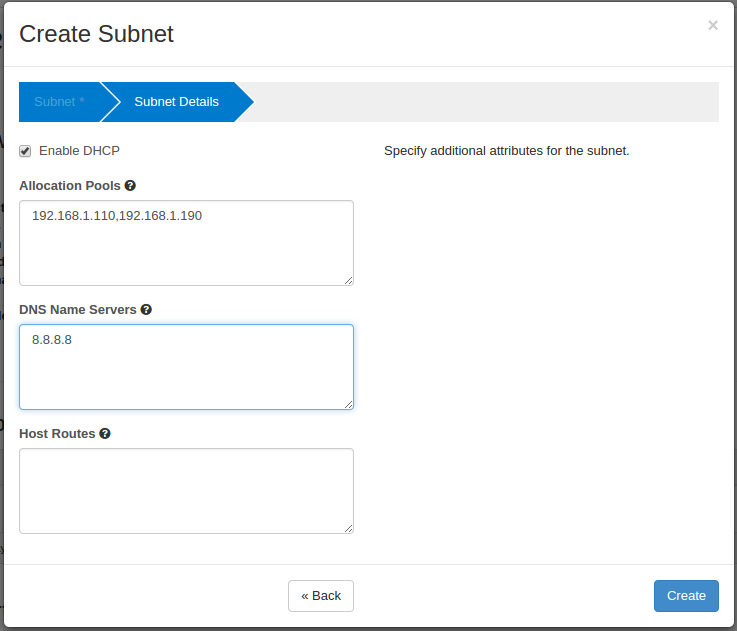
Demo Subnet:
Demo Subnet detail:
Launch an instance & Have fun 🙂
cheers:-)
Hi,
nice post!
We try to integrate our VDX switches with our Openstack environment too, but I ran in some truble.
Is there a reason, why you use brocade as a core driver?
We try to use ml2 as a core driver and let the brocade ml2 plugin handle the stuff.
But as I said it doesn’t work like it should.
In the neutron server logs I can see that it authenticates with the VDX-Switches but I can’t deploy a network.
That’s what the log says:
“Exception: Brocade Mechanism: failed to create network, network cannot be created in the configured physical network”
“MechanismDriverError: create_network_precommit failed.”
I thought I had a mistake with my physnet1 configuration and the bridges but as far as I can tell everything looks fine.
Would be nice if you can contact me via email, so I can give you more details.
Hi..
The core_plugin we should use for this setup is ml2 only. Please refer my updated post above.
What is the ” network_vlan_ranges = ” you mentioned in your /etc/neutron/plugins/ml2/ml2_conf.ini configuration file?
Hi,
The vlan ranges are “network_vlan_ranges = physnet1:250:299”
Now your configuration looks almost like ours. We have a 3 node setup.
As I said, it only authenticates on the VDX:
INFO neutron.plugins.ml2.managers [-] Initializing mechanism driver ‘openvswitch’
INFO neutron.plugins.ml2.managers [-] Initializing mechanism driver ‘brocade’
INFO ncclient.transport.ssh [-] Connected (version 2.0, client OpenSSH_6.2)
INFO ncclient.transport.ssh [-] Auth banner:
INFO ncclient.transport.ssh [-] Authentication (password) successful!
INFO ncclient.transport.session [-] initialized: session-id=2426
….
INFO ncclient.operations.rpc [-] Requesting ‘GetConfig’
INFO neutron.plugins.ml2.plugin [-] Modular L2 Plugin initialization complete
According to the errorlog it could be something wrong with my phsynet1 configuration, but I couldn’t find any error so far.
The br-eth1 is connected to my data-tunnel interface like yours.
could you send the log files to my mail?
Hi,
The Brocade switch is power off/on, The configurations on switch will be lost ???
Th ML2 driver will configure the Brocade switch.
I don’t know running config will be save immediately.
The switch during is power glitch.
Th ML2 driver will configure the Brocade switch.
I don’t know running config will be save immediately