Virtual Tenant Network (VTN)
Technical Introduction:
OpenDaylight Virtual Tenant Network (VTN) is an application that provides a multi-tenant virtual network on an SDN controller.
VTN allows the users to define the network with a look and feel of the conventional L2/L3 network. Once the network is designed on VTN, it automatically gets mapped into the underlying physical network, and then configured on the individual switch leveraging SDN control protocol. The definition of the logical plane makes it possible not only to hide the complexity of the underlying network but also to manage network resources better. It achieves reducing reconfiguration time of network services and minimising network configuration errors.
Introduction for beginners:
Above technical introduction might be difficult to understand for the SDN beginners. In this post, I tried as much simple as I can, to teach the readers about VTN and its integration with OpenStack.
I believe the readers would have a basic understanding of what is SDN. So let me start with VTN directly.
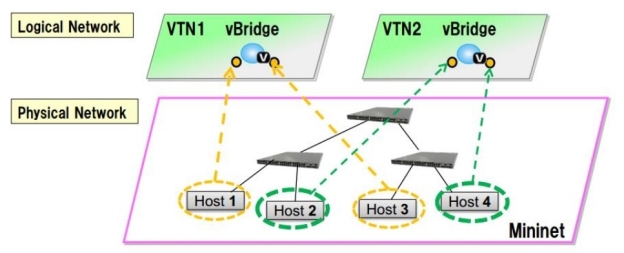
The SDN VTN manager helps you to aggregate multiple ports from the many underlying SDN managed switch (both physical and Virtual) to form a single isolated virtual network called Virtual Tenant Network. Each tenant network has the capabilities to function as an individual switch.
For example,
Consider that you have two physical switches (say s1 & s2 ) and one virtual openVswitch (say vs1 ) in your lab environment. Now with the help of VTN manager, it is possible to group (aggregate) the three ports (say p1,p2,p3) from switch s1. i.e, s1p1,s1p2,s1p3 and two ports from switch s2. i.e., s2p1,s2p2 and two ports from the virtual switch vs1. i.e, vs1p1,vs2p2 to form a single switch environment (Say VTN-01).
It means, virtually the group(tenant) named VTN-01 is a one switch with 7 ports(s1p1, s1p2, s1p3, s2p1, s2p2, vs1p1, vs2p2) in it. This VTN-01 will exactly act like a single isolated switch with the help of flows configured in the ports of all three switches by the Opendaylight VTN manager.
The above example explained the concept called port mapping in VTN is only for the beginners to understand the basic concept better which would help them to compare all other VTN concepts like VLAN mapping and MAC mapping by comparing the example mentioned above.
VTN OpenStack Integration:
There are several ways to integrate Opendaylight with Openstack, this
blog will focus on the method which uses VTN features available on OpenDaylight controller. In the integration, VTN Manager works as network service provider for OpenStack.
VTN Manager features to empower the OpenStack to work in pure OpenFlow environment in which all the switches in data plane are an OpenFlow switch.
You could also refer my blog on “Opendaylight Integration with Openstack using OVSDB” from the below link.
http://www.cloudenablers.com/blog/opendaylight-integration-with-openstack/
Requirements:
- OpenDaylight Controller
- OpenStack Control Node
- OpenStack Compute Node
OpenDaylight Support for Openstack Network types:
Till Boron release, ODL only supports “Local” network type in openstack and there is no support for VLAN. You may wonder why they never speak about Vxlan and GRE tunnelling network types support like I did
You would nail down the answer if you could recall the example I have mentioned at the beginning of this post. Let’s recap it again. I have said that with the help of VTN manager, the user can group multiple ports from multiple switches in their infrastructure to form the single isolated network.
Let’s compare this with our openstack environment which has two openvswitch installed in the controller and compute node.
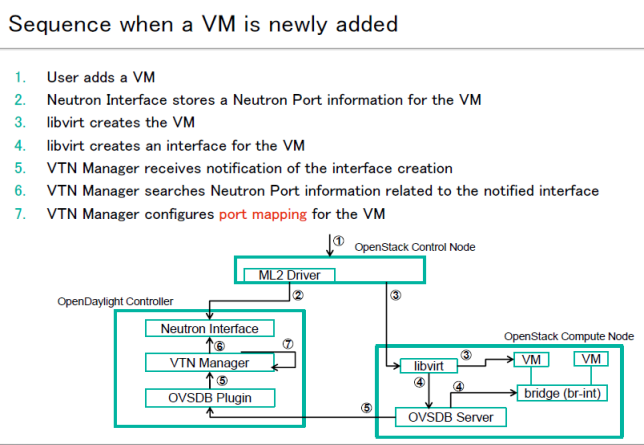
- Whenever the new network created in openstack, for which VTN Manager creates a new VTN in ODL.
- Whenever a new sub–network created, VTN Manager will handle the same and create a vbridge under the VTN. vBridge is nothing but the Virtual Switch.
- When new VM Created in the openstack, The addition of new PORT in the Openvswitch of compute node is captured by VTN Manager and it creates a vbridge interface In the newly created vBridge and map that openvswitch port with the particular vbridge port.
- In this case, the port (say vs1p1) of DHCP agent in the openvswitch of the controller node and the port (vs2p1) of the VM in the compute node is isolated from the actual openvswitch using the flow entries from the opendaylight VTN manager to form new Virtual switch environment called Virtual Tenant Network.
- when the packet sent from the DHCP agent reaches the openstack controller’s openvswitch port vs1p1. then flow entries will tell the port vs1p1 to forward the packet to the compute node’s openvswitch port vs2p1 using the underlying physical network. This packet will send as a regular TCP packet with source and destination MAC address. It means the traffic created in one network can send as a regular packet across the controller and compute node without any tunnelling protocol.
- And this explains why support for VxLAN and GRE network type is not required.
LAB Setup layout:
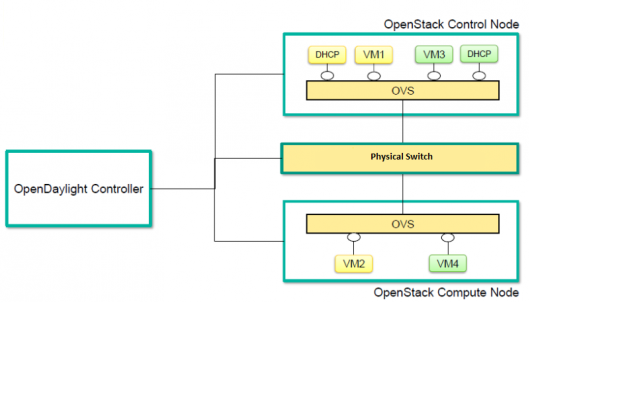
The VTN features to support multiple OpenStack nodes. You can deploy multiple OpenStack Compute Nodes.
In management plane, OpenDaylight Controller, OpenStack nodes and OpenFlow switches (optional) should communicate with each other.
In data plane, Open vSwitches running in OpenStack nodes should communicate with each other through a physical or logical OpenFlow switches (optional).
The core OpenFlow switches are not mandatory. Therefore, you can directly connect to the OpenvSwitchs.
You may need to disable firewall / ufw in all the nodes to reduce the complexity.
Installing OpenStack with OpenVswitch configuration:
Installing OpenStack is not in the scope for this document, However getting started with a minimal multi-node OpenStack deployment is recommended.
|
To help speediness the process, you could use my fully automated bash script for installing the openstack – Mitaka setup.
https://github.com/CloudenablersPvtLtd/openstack-setup
Note: This script will install openstack and configure Linux bridge for networking. But for the VTN integration to work in openstack, we need network configuration with openvswitch. So, you must uninstall the Linux bridge settings and reconfigure with openvswitch.
|
After the successful openstack installation, run the sanity test by performing the following operations.
Create two instances on a private subnet, and add the floating IP address from your public network, and verify that you can connect to them and that they can ping each other.
Installing OpenDaylight:
OpenDaylight Controller runs in a JVM. Opendaylight – Boron release requires openjdk8. So Install openjdk8 using the below command.
$apt-get install openjdk-8-jdk
Download the latest OpenDaylight-Boron package from the official repo.
Untar the file as root, and start OpenDaylight using the command below,
$ tar –xvf distribution-karaf-0.5.1-Boron.tar.gz
$ cd distribution-karaf-0.5.1-Boron.tar.gz
$ ./bin/karaf
Now, you should be in OpenDaylight’s console. Install all the required features.
opendaylight-user@root> feature:install odl–vtn-manager-neutron
opendaylight-user@root> feature:install odl–vtn-manager-rest
opendaylight-user@root> feature:install odl-mdsal-apidocs
opendaylight-user@root> feature:install odl–dlux-all
Feature installation may take some time to install. Once the installation is completed, you can check whether everything is working fine by using the below curl call.
$ curl -u admin:admin http://<ODL_IP>:8080/controller/nb/v2/neutron/networks
The response should be an empty network list if opendaylight is working properly.
Now, you should be able to log into the dlux interface on http://<ODL_IP>:8181/index.html
The default username and password are “admin/admin”.
Additionally, you could find the useful log details at the below location,
$ tail -f data/log/karaf.log
$ tail -f logs/web_access_log_2015-12.txt
Now, you are up with the working OpenDaylight-Boron setup. Congratulate yourself!
Let’s get into the Integration part.
Openstack Configuration for VTN Integration:
Step 1:
Erase all VMs, networks, routers and ports in the Controller Node
Since you already have the working OpenStack setup. You might test for VM provisioning as a sanity test, but before integrating the openstack with the OpenDaylight, you must clean up all the unwanted data from the openstack database. When using OpenDaylight as the Neutron back-end, ODL expects to be the only source for Open vSwitch configuration. Because of this, it is necessary to remove existing OpenStack and Open vSwitch settings to give OpenDaylight a clean slate.
Following steps will guide you through the cleaning process!
• Delete instances
$ nova list
$ nova delete <instance names>
• Remove link from subnets to routers
$ neutron subnet-list
$ neutron router-list
$ neutron router-port-list <router name>
$ neutron router-interface-delete <router name> <subnet ID or name>
• Delete subnets, nets, routers
$ neutron subnet-delete <subnet name>
$ neutron net-list
$ neutron net-delete <net name>
$ neutron router-delete <router name>
• Check that all ports have been cleared – at this point, this should be an empty list
$ neutron port-list
• Stop the neutron service
$ service neutron-server stop
While Neutron is managing the OVS instances on compute and control nodes, OpenDaylight and Neutron can be in conflict. To prevent issues, we turn off Neutron server on the network controller and Neutron’s Open vSwitch agents on all hosts.
Step 2:
Configure OpenvSwitches in Controller and Compute Nodes
The neutron plugin in every node must be removed because only OpenDaylight will be controlling the openvswitches. So, on each host, we will erase the pre-existing Open vSwitch config and set OpenDaylight to manage the openVswitch.
$ apt-get purge neutron-plugin-openvswitch-agent
$ service openvswitch-switch stop
$ rm –rf /var/log/openvswitch/*
$ rm –rf /etc/openvswitch/conf.db
$ service openvswitch-switch start
$ ovs-vsctl show
# The above command must return the empty set except OpenVswitch ID and it’s Version.
Step 3:
Connect Openswitch with OpenDaylight
Use the below command to make the opendaylight administrate the openvswitch.
$ ovs–vsctl set-manager tcp:<OPENDAYLIGHT MANAGEMENT IP>:6640
You can copy the OpenVswitch ID from the command “ovs–vsctl show”.
Execute the above command in all the node (controller & Compute nodes) to set the ODL as the manager for the openVswitch.
$ ovs-vsctl show
The above command will show that you are connected to the OpenDaylight server, and OpenDaylight will automatically create a br-int bridge.
|
[root@vinoth ~]# ovs-vsctl show 9e3b34cb-fefc-4br4-828s-084b3e55rtfd Manager “tcp:192.168.2.101:6640” Is_connected: true Bridge br-int Controller “tcp:192.168.2.101:6633” fail_mode: secure Port br-int Interface br-int ovs_version: “2.1.3”
|
If you get any error messages in this bridge creation, you may need to Logout from the opendaylight karaf console and Check “90-vtn-neutron.xml” file from the following path “distribution-karaf-0.5.0-Boron/etc/opendaylight/karaf/”.
The contents of “90-vtn-neutron.xml” should be as follows:
|
bridgename=br-int
|
By default, if 90-vtn-neutron.xml is not created, VTN uses ens33 as port name.
After running ODL Controller, please ensure ODL Controller listens to the ports:6633,6653, 6640 and 8080.
Note:
6633/6653 – OpenFlow Ports
6640 – OVS Manager Port
8080 – Port for REST API
Step 4:
Configure ml2_conf.ini for odl driver
Edit vi /etc/neutron/plugins/ml2/ml2_conf.ini in all the required nodes and modify the following configuration. And leave the other configurations as it is.
|
[ml2] type_drivers = local tenant_network_types = local mechanism_drivers = opendaylight
[ml2_odl] password = admin username = admin url = http://<OPENDAYLIGHT SERVER’s IP>:8080/controller/nb/v2/neutron |
Step 5:
Configure Neutron Database
Reset the neutron database,
$ mysql -uroot –p
$ drop database neutron;
$ create database neutron;
$ grant all privileges on neutron.* to ‘neutron’@’localhost’ identified by ‘<YOUR NEUTRON PASSWORD>’;
$ grant all privileges on neutron.* to ‘neutron’@’%’ identified by ‘<YOUR NEUTRON PASSWORD>’;
$ exit
$ su -s /bin/sh -c “neutron-db-manage –config-file /etc/neutron/neutron.conf –config-file /etc/neutron/plugins/ml2/ml2_conf.ini upgrade head” neutron
Restart the neutron-server:
$ service neutron-server start
Step 6:
Install Python-networking-odl python module
IMPORTANT:
Probably, you should get the status as neutron service failed to start by this time.
Don’t worry; this is a temporary issue. Since you have enabled opendaylight as a mechanism_driver but not yet installed the python module for it.
So here we go, Install python-networking-odl python module.
$ apt-get install python-networking-odl
Now, restart the neutron-server and check its status which should be running without errors.
Step 7:
Verify the integration
We are almost completed the OpenStack with VTN integration.
Now, it’s time to verify it.
Create initial networks in openstack and check whether a new Network create is POSTED to ODL, for which VTN Manager creates a VTN.
Use the below curl commands to verify the network and VTN creation.
$ curl –user “admin”:”admin” -H “Content-type: application/json” -X GET http://<ODL_IP>:8181/restconf/operational/vtn:vtns/
$ curl -u admin:admin http://<ODL_IP>:8080/controller/nb/v2/neutron/ networks
Whenever a new sub–network is created in the openstack Horizon, VTN Manager will handle the same and create a vbridge under the VTN.
When you created new VM, the interface (br-int) mentioned as integration bridge in the configuration file, will be added with more interfaces on the creation of a new VM in Openstack and network is provisioned for it by VTN neutron bundle.
The addition of new PORT is captured by VTN Manager, and it creates a vbridge interface with port mapping for the port.
When the VM starts to communicate with other VM’s created, VTN Manger will install flows in the OVS and other OpenFlow switches to facilitate communication between VM’s.
Note:
To access OpenDaylight RestConf API Documentation, use the below link pointing to your ODL_IP.
http://<ODL_IP>:8181/apidoc/explorer/index.html
Congratulate yourself!
If everything works correctly, you will able to communicate with other VM’s created in the different compute nodes.
Note: VTN project doesn’t support the vRouter till Boron release which means floating IP operation in openstack is not supported in the VTN manager integration with Openstack. They might support the vRouter in Carbon or Nitrogen release.
__________________________________
Cheers,
Vinoth Kumar Selvaraj
Leave a Comment